FAQ — Casa Pacis

RETURN TO FAQs

RETURN TO CASA PACIS HOME PAGE

————————————————————

Power Outages — Use of “Yeti-6000X” Power Back-up System

Method (1): UNSCHEDULED OUTAGES:

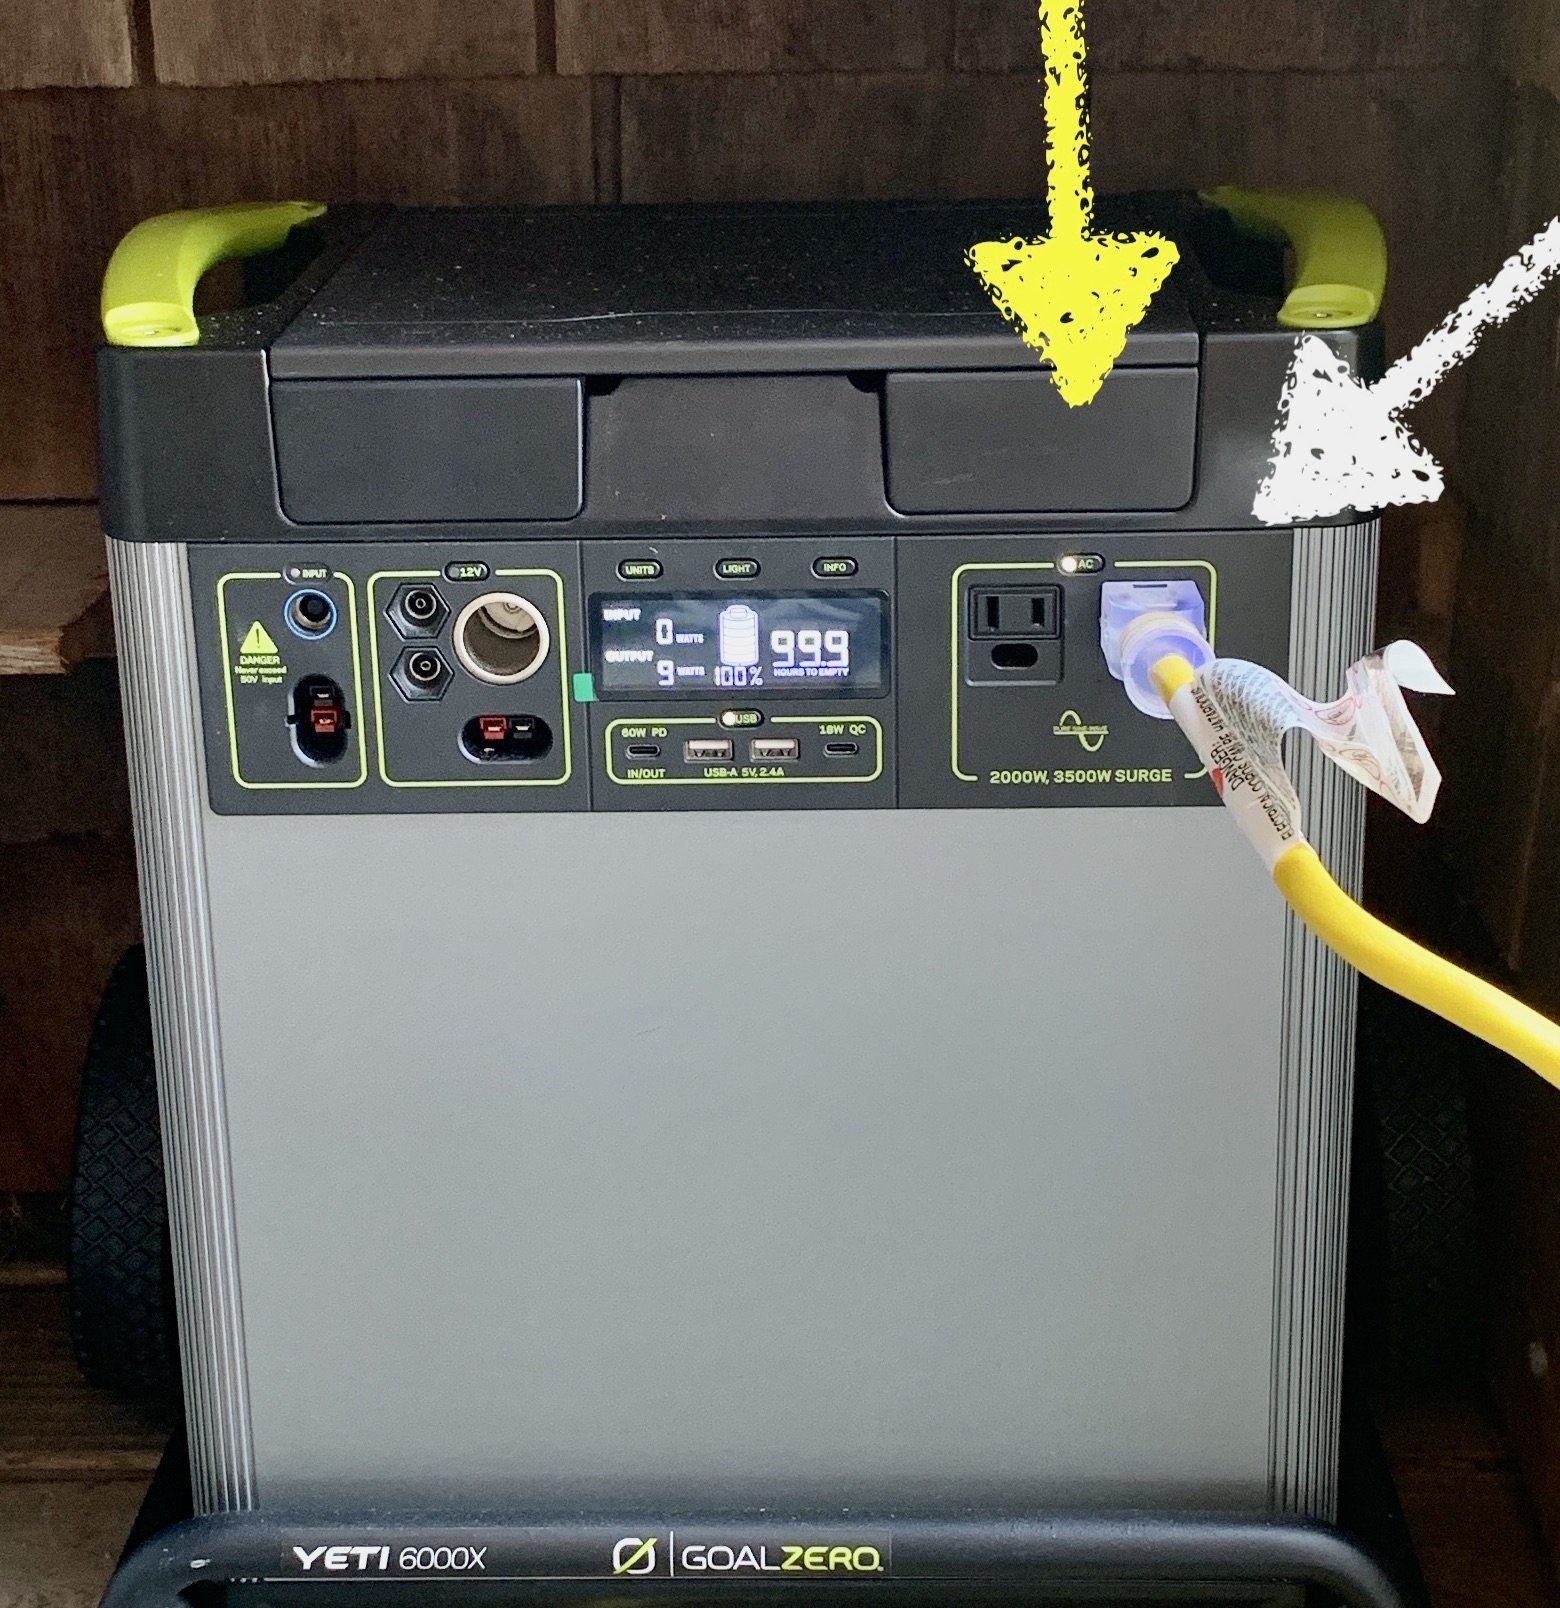
Photo 1: Yeti 6000X battery. Yellow arrow points to [tiny] on/off button; white arrow points to 120V outlets. Yellow cable goes to an appliance of choice (method (1)) or to the transfer switch (method (2)).

These occur relatively more frequently than PSPS outages, and they last typically only a short time (up to a few hours).
— Find a powerful battery “Yeti 6000X” (Photo 1) in a closet.
— Unplug charger (lower left on front panel)
— Roll Yeti to where you like power and plug items directly into outlets (white arrow).
— Use extension cords as needed.
— Activate on/off button (yellow arrow in Photo 1).
— After end of power outage, re-position Yeti and re-connect input power, to re-charge Yeti.

You may plug in utility items (microwave, water kettle, hair dryer) as you wish, but use ONLY ONE OF THESE AT ANY ONE TIME (the Yeti power output is limited to 1500 Watts, and these appliances use about 1000 W each, and using two of these at the same time will blow a fuse). Lights, TV, etc. don’t matter and can be on simultaneously.

==================================

Method (2): SCHEDULED “PSPS” OUTAGES (VIA TRANSFER SWITCH):

We will typically inform you if and when a PSPS outage is forecast.
You may find it most convenient to just use Method (1), even during PSPS outages. Else keep on reading.

Photo 2 Transfer switch (next to circuit breaker panel) connected ad-hoc with yellow power cord to Yeti 6000X battery. (Equipment is NOT rainproof).

WE STRONGLY ADVISE TO READ THIS PRIOR TO CONSIDERING TO USE THE TRANSFER SWITCH.

INTRODUCTION:

The Sea Ranch is serviced by PG&E. As a wildfire prevention measure, PG&E may turn off electric power during extreme weather conditions. During such "Public Safety Power Shutoff" (“PSPS”) situations. outages may last for as long as several days. This has actually happened seldom in the past at Sea Ranch but nowadays, with global warming, it may happen more frequently.
To bridge over outages, we have equipped Casa Pacis with a 6 kilowatt-hour “Yeti 6000X”back-up battery. In a few simple steps, battery can be connected to a power transfer switch (installed — protected from the elements — in a wooden lamp housing on the outside house wall next to the electric circuit breaker panel). It interfaces with five critical electrical circuits of the house, thus providing off-grid emergency power to five circuit breakers that service the refrigerator, the TV area in the LR, the Internet hook-up in the loft, some outlets in the kitchen so you can make coffee, use the toaster and the microwave, and provide some lighting in various locations.

Photo 3: The Yeti 6000X back-up power battery is located in the garage. The heavy yellow power cable must be connected into one of the two outlets as step (2) of this set-up procedure. The yellow arrow shows the power cord connection to the transfer switch plugged in. The white arrow points to the little on/off button, which must be pushed as Step (6) of the set-up procedure. (White LED confirms “on” position). Use the black power adapter to re-charge the Yeti 6000X after the end of the power outage.

Setting up the Yeti 6000X back-up power battery requires no technical expertise but patience to read and follow the “set-up procedure” below.

WE INSTALLED THIS AMENITY FOR OUR PERSONAL USE BUT MAKE IT AVAILABLE TO OUR GUESTS AS A COURTESY. IF YOU MAKE USE OF IT, PLEASE DILIGENTLY FOLLOW THESE INSTRUCTIONS.
Please understand that the actual energy available in that battery is the same in this “complicated” Method (2) as it is in the simple Method (1) described above.

——————————————————-

SET-UP PROCEDURE OF YETI-6000X VIA TRANSFER SWITCH:

Photo 3: remove 3 screws (with hex screw driver), then pull out cover to expose transfer switch.

Photo 4: Outside light fixture serving as housing for the transfer switch assembly. Remove 3 screws (with hex screw driver), then pull out and set aside cover to expose transfer switch.

NOTE: NEITHER THE TRANSFER SWITCH NOR THE YETI 6000X BATTERY SHOULD BE EXPOSED TO MOISTURE. DO NOT PROCEED WITH THIS SET-UP WHEN RAIN IS POSSIBLE (the equipment is not rainproof).

(1) Move the Yeti 6000X to the sheltered position on the front porch (Photo 3).
(2) Connect it to power, to allow charging while power is still on.
(3) Find a screw Philips driver in its top compartment.
(4) Locate the wooden outside light cover (Photo 4).
(5) Remove 3 screws holding this cover (arrows in Photo 4).
(6) Pull cover straight out and set it aside. Transfer switch is now accessible (Photos 5).
(7) Connect yellow power cable
from Yeti 6000X to transfer switch (red arrow).
(8) Lock plug with a gentle clockwise twist.
(9) Flip SWITCHES (Photo 5, yellow arrow) up from "LINE" to "GEN".
(10) Flip up those circuit breakers you wish to use
(Photo 5 green arrow).
(11) Push the small power button on the Yeti (Photo 1, yellow arrow).
(12) Revert everything
after the end of the power outage or when rain is imminent.

You now have established auxiliary power to the house. The more sparingly you use it, the longer it will last (details explained below).

Important advisory: Use ONLY ONE KITCHEN APPLIANCE AT A TIME (to avoid circuit overload - 15A fused)

BASIC UNDERSTANDING

Here are some basic notes providing understanding how long the battery will last, and how to conserve battery energy:

— Treat this back-up power like you would use a flashlight. Use only when needed, as it runs out of power after a while. Whenever you use Yeti energy during the brown-out period, such as for lights or TV, the energy left as power reserve will shrink. The front panel of the Yeti shows you how much energy you are currently using and how much is still left. You start with 5-6000 Watt-hours at your avail, which can bridge over quite a long power outage if you are frugal.

— The transfer switches disconnect the [five] pre-selected circuits from the big house breaker panel and turn their function over to the Yeti 6000X battery. This means, when there is no power outage, the regular circuit breakers in the power panel engage all electric circuits, and the transfer switches are bypassed. In the “generator” mode (i.e., when the Yeti is connected), the circuit breakers in the transfer switch are engaged [in series to the original breakers].

—- When the power outage is over, you must manually reverse the Yeti connection procedure to get back to normal functioning. You can do this at any time while PG&E power is back on line (no need to rush) but, of course, the longer you wait, the more you will deplete whatever power is left in the Yeti).

— When on Yeti power, there are three major items continually depleting the Yeti battery: the Internet system, the TV system, and the refrigerator (figure about 1.5 kWh (1500 Watt-hours) in total per 24-hour outage period just for these).

— Of these, the refrigerator uses relatively most energy (minimum about 1kWh in 24-hours), and you can greatly conserve its power consumption by MINIMIZING OPENING THE REFRIGERATOR DOORS AND PLACING ITEMS INTO IT. ALSO, MINIMIZE USE OF THE ICE MAKER (making ice uses a lot of power; better, turn the ice maker off).

— Modern lighting (as opposed to the old incandescent light bulbs) uses relatively little power. Nonetheless, MINIMIZE THE DURATION WHEN ANY LIGHTS ARE ON BUT NOT USED.

Microwave, coffee maker, water kettle, and toaster are high-wattage appliances (about 1000 Watts each); use them sparingly and ONLY ONE AT A TIME (should you forget and blow a fuse, disconnect the “offending” appliances and flip on the tripped breaker(s) at the transfer switch assembly).

Photo 5: Transfer switch ssembly. Yellow arrow: switches shown in normal operation (“LINE,” all switches down). After the battery supply has been connected via the yellow cable with 4-prong plug, flip four green switches upwards to the “GEN” position. Red double switch to the left supplies power to Microwave circuit — flip if wanted. Green arrow: Circuit breakers; flip up to “on” position after transfer switches have been flipped to GEN position.. Red arrow: receptacle to receive yellow power cable from Yeti 6000X. Twist slightly clockwise to lock.

DETAILED ENERGY CONSERVATION RECOMMENDATIONS DURING BROWN-OUT PERIODS

NOTE THAT YOU HAVE 6 KWH (6000 Wh) STORED TO FOR USE DURING A POWER OUTAGE.

Here are some rules of thumb:
Internet and phone (in the loft): consumes 250 Wh per day (no concern)
Refrigerator: consumes ~ 1000 Wh per day if opened sparingly (use wisely)
Single light bulb: 7-12 Wh per hour (“almost” negligible impact on battery)
light bar in bathrooms: 30 Wh per hour (also negligible if turned off after use).
outlet in bathroom for razor or nightlight: negligible.
outlet in bathroom for hair dryer: 1000 Wh per hour of use (USE WISELY)
TV: ~ 250 Wh standby per day; ~75 Wh per hour while in use;
— add 100 Wh per hour if you use the DVD player).

Microwave: ~ 800 W, uses about 80 Watts for a 6-minute engagement
Kitchen lights: negligible consumption, but turn off when not in use.
— Toaster: 1200 W; but only ~ 120 Wh per usage event
Microwave: 800 W; but only ~ 80 Wh per 6-minute use.
Coffeemaker: 800 W; but only ~ 100 Wh per brewing event.
Water kettle: 1200 Watts;l; about ~ 200 Wh to boil 2 cups of water.
ONLY use 1 utility (toaster, microwave, coffeemaker, kettle) at any ONE time

Shower: DHW if IOFF during outage (all you have is residual 40 gal of tank)
— Hot tub: no heating during the outage period.
— Space heating or A/C: unavailable during power outage.

====================================

UPON THE END OF THE POWER OUTAGE:

  • IMPORTANT: Reverse all 12 steps of set-up procedure. In particular, please:

  • Push button to turn off output power from Yeti 6000X (Photo 1, white arrow - control light off).

  • Unplug power cable from Yeti (Photo 1, yellow cable) and from transfer switch (Photo 5, red arrow - twist slightly counter-clockwise to unlock) and store as you found it. Store Yeti inside where you found it.

  • Not super-important, but please do: to allow the Yeti 6000X to re-charge, connect the black power adapter to the an outlet and to the Yeti (fitting connector in lower left corner of front panel). You will then notice that the Yeti 6000X will charge at a rate of about 570 Watts. The time to fully recharge is indicated on the front panel (~10 hours from all-empty).

  • During charging, the charger will get hot. Make sure not to place any object on top of it.

Call Klaus at 408-731-0794 if there is any question or problem.

On a different note, press here if you are interested in solar photovoltaic design and performance evaluation at Sea Ranch (as well as in the SF Bay Area). This is a very extensive “White Paper” which I wrote for the benefit of neighbors and fellow Sea Ranchers. It is based on my personal professional decades-long experience with solar thermal and photovoltaic technology and, while generic, is tailored to Sea Ranch climate and can be adapted to most specific applications in Sea Ranch. The Paper includes the following topics:
Solar PV Installations
Solar Thermal Installations
The Influence of Shading on Solar PV Collection
Other Noteworthy Results, and
PV System Sizing and Battery Back-up Recommendations.